Wednesday, 23 June 2010

Thread Holder Tutorial


I don't know about you, but I never know how to store my thread.
I don't have hundreds, so I don't need a great big holder.
I have just a few, and want them to look cute!

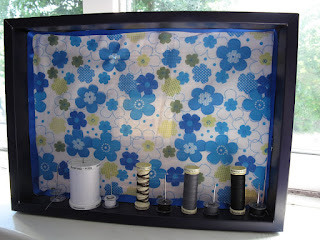
So, I came up with this idea. I turned the lid of a chocolate box into a holder.
Note: It's best to eat the chocolates first! 
*Unless, like me you are allergic to chocolates and have the sorrow of watching others eat them for you*


I lined the lid with fabric, using double-sided tape to secure it. I then used some more tape to put ribbon round the edges of the fabric.


Then, I pushed tall needles into the thick 'bottom' of the lid to hold the threads and bobbins in place.


So simple!

Monday, 21 June 2010

Sewn Cards!


Well, recently I did a variation on them, inspired by another blogger. Unfortunately, I cannot remember who it was, please let me know if you know who it is, I always try to give credit where it's due!


The fabric I won from Sew Mama Sew! makes a good background. :)

These cards are so easy to make that they don't need a tutorial.


However, they look extra special, and very cool.


Are you wondering how I make the cards that shape without buying ones like that? I cut an A4 sheet of white card in half, and then fold that in half lengthways. It's an easy and cheap way to make your cards a bit different.

You can practise your zig-zag stitch at the same time, too!
And the other fancy decorative stitches your sewing machine has.
They're always cute, and your friends will love to receive cards that you have made.

:)

On another note... I had a look at my sitemeter tracker the other day, and was amazed at how many different continents and countries view my blog. There are 3 continents and 22  countries at the last count! That's amazing!

Click on the image to see more.


I am so thrilled that my readers are growing all the time, thank you for your support!

Oh, and I love encouraging comments. Feel free to drop me one anytime!

:)


Photobucket


Go over to amylouwho for more amazing ideas!

Monday, 14 June 2010

Spray Painted Treasure Chest


At the same time I did that project, I used the leftover paint to spray a cute little treasure chest.


I didn't want to paint the hinges, too, so I took them off. I also gave them a clean using these tips. Ketchup seemed to work quite well! I found out afterwards that the hinges are an alloy and not real bronze, but the cleaning tips still worked, and took off years of dirt.

An easy way to find out if your hinges are real bronze or not is to find a magnet and see if it will stick to the hinges. If it does, they aren't real bronze, but an alloy.

After I had allowed the paint to dry (the waiting is the hardest bit!) I put the hinges back on and admired the new finish. I distressed the edges a bit for character and left it at that.

My 'new' chest now sits on my windowsill with my favourite vase (Dunelm Mill, £4.99) .


Unfortunately, my camera isn't behaving so well today, so I had to use flash to take the photo. The flash is making the treasure chest look white, when in fact it is exactly the same colour as the chair!

For you camera geeks out there: The ISO setting is playing up; I change the dial to make it higher but it doesn't seem to make the difference in light and colour that it normally does. Any suggestions for one confused camera geek?


I really enjoy looking out of my window and seeing the elderflowers!  You may not have noticed, but whenever I have photo-shoots on my window-sill, I always point my camera to the left. That's because you wouldn't be so jealous looking the other side, and seeing old cars and houses! :)


CreativeShareWednesdays


Friday, 11 June 2010

Quilted Oven Gloves Tutorial


Have you ever wanted to try quilting, but not felt brave enough to try it on a big quilt?

Try making these oven gloves!


Step One: First of all, you need to make two patchwork pieces. If you wanted to make this a bit quicker, you could just cut two pieces of fabric to the right size and not patchwork it. These will be the main parts of your oven gloves. You might want to model them on a pair of oven gloves you already have, but make sure it is considerably bigger, when you quilt, the fabric tends to shrink. Also, stitch the joins very well; I stitched mine four times!


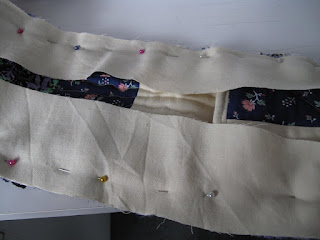
Step Two: Now that you have your two main pieces, it's time to put them together. Get some thick wadding and cut it to the same size of your main pieces. Make a quilt sandwich and pin with safety pins. It should be pinned so that the right sides of the fabric face out, as shown below. Now, quilt it! Always start from the middle when quilting. I just went crazy with the quilting; you can do it anyway you like! Quilting just holds the fabric together.


Step Three: Now, trim any surplus wadding and do a zig-zag stitch round the edge to keep it all neat and tidy. I went round twice, just to be sure it was secure.


Step Four: Make your gloves now! I did this exactly the same as Step One, only smaller! I did diagonal quilting this time, for variety. Remember to make two. Stitch them to your oven gloves.

Front


Back


Step Five:  Make (or use ready-made) binding for the gloves. Work out how long you need and then sew the ends together. Then pin one side down to your oven gloves and sew around the edge.


Step Six: Then you need to fold over the other edge of your binding and sew it down.


You now have a completed set of quilted oven gloves!


They would make a great house warming gift, or you could keep them for yourself. :)

Go over to Amy's blog by clicking on the button for lots of fantastic ideas!


The Girl Creative

Thursday, 3 June 2010

Sock Animals from Homemade by Jill and some new fabric!


This week, I've been making sock animals!


I hadn't made anything like this before, so did a practise one with some old socks.


After I had had a practise and was confident I could do it, I bought some new socks to make some with and made both types of rattles.


Cute, much?


I love making things for other people, and these sock animals are going to a friend's little daughter.

This is a great sewing project, and even better, you don't have to use a machine! The bell inside the head to make it rattle is pure genius, well done Jill!


This morning, I went fabric shopping! I don't go that often, so it's always a treat to go. :)

Have a look at the yummy fabric I bought!

This size of fabric is called a craft stick.


They're this big!
|
|
|
\ /


I also bought some fabric by the metre, and some matching ribbon. I might use it to make a skirt to enter into Crafterhours' Skirt Week!


Expect projects with yummy fabric to come soon!

:)