Friday, 30 April 2010

Handmade Cards


Do you need some more inspiration for making cards?

Here's some!

As you probably know by now, I like recycling cards. Everything on the front of this card came from another one!


I also really like using Forever Friends papers. (No, I'm not being paid to say this!)
They're just so cute. :)


This card also uses Forever Friends paper, as well as lots of ribbon.


For this one, I used a Forever Friends stamp, and then coloured it in using Whispers pens.


Here's one last card, with my latest painting on.
Pansies are one of my favourite flowers, and purple is my favourite colour, so I'm especially pleased with this painting.


I hope you're feeling inspired now, get creating!

:)


Life in the Pitts


Thursday, 29 April 2010

I'm on Flickr!


Hi! Just a quickie to announce that I know have Flickr! I'll upload a photo for each new tutorial, so it's another great way to keep up with what I'm doing! 
Click here to go to my page!

P.S. Have you entered my latest giveaway yet? If not, click here or scroll down for more details!

Wednesday, 28 April 2010

Baby Blocks/Pincushions


Have you ever thought that there must be an easy way to make a cube, but never been sure just how to do it?
I'll explain it for you.


Step One: Cut out six squares of fabric the same size. I used a coaster as my template.

Step Two: Sew four together in a line. You may want to stitch it a few times to ensure it is secure.

Step Three: Sew the two ends of your line together.

Step Four: Turn your joined squares inside out. Pin a square to the bottom and stitch all the way round a few times. Repeat this stage to attach the top square, but remember to leave and opening so that you can turn your cube the right way out, and so that you can stuff it.

Step Five: Turn your cube the right way out. Now, stuff it with scraps of wadding. You can fit in about 3 times you think you'll be able to!

Step Six: Have fun admiring your new creation. You could make for a baby you know to play with, or you could use it as a pin cushion. Don't use it for both purposes, though!


I made another one to use as a pincushion and put it in a hand painted ceramic box.


Cute, huh?

See you soon! :)

Linking up to Amylouwho's Sew n Tell Fridays!

Monday, 26 April 2010

GIVEAWAY!


Ready for another giveaway?
Me too!


The choices this month are: 

Lots of beads, perfect for jewellery making, etc. 


Or:  One super cute cross-stitched hanger for your kitchen


If the other options didn't take your fancy, how about 80 amazingly sweet buttons? Buttons were popular in last month's giveaway, so I thought I'd give you another chance to win some!


How to enter:
1. Comment on this post and tell me you'd like to be entered into the giveaway, and also which option you would like to win .

NEW:
2. Desperate to win? Here's another chance! Either blog about this giveaway (and leave the link in a comment) OR tell me what you would do with your prize if you won in a SEPARATE comment.

Please, only two comments per person!
:)


You have until midnight GMT time on Sunday 2nd May to enter.
Random.org will be choosing the winner and it will be announced on Monday 3rd May.
I don't mind what part of the world you are entering from and I also don't mind if you won the last giveaway and would like to enter this one as well. 

See you soon!

:)

Friday, 23 April 2010

Repurposed: Rabbit Hutch to Raised Veg Bed

Yep, another repurposing post. If you haven't guessed already, I like repurposing and using what I have. :)
But this repurpose doesn't involve sewing, double sided taping, etc.
It uses my trusty friend, the staple gun!
I bought mine from Argos and it has served me well. I've also used it here and here. (Please note - I'm not being paid to say this!) 

My mum and I made our first rabbit hutch a few years ago. Since then, we have made a better one, so this old rabbit hutch has been sitting on its own, rather lonely. It was time to put it to use again, and make it into a raised vegetable plant bed! 

First of all, I took the doors off the hutch. They fell off, so that was easy!


Then, I found six old compost bags and turned them inside out. I stapled them to the hutch, three along the long sides, one at each end, and one on the bottom to prevent leakages. At this stage I was getting odd looks from my family, who seemed to think it looked like a coffin...


But it's the opposite, it will give your veggies a new lease of life!
Now, I filled the bottom of it with polystyrene and pebbles, to help drainage. Sorry, no photo!
Then, it was filled with soil and planted up. 


I stapled the packets of the seeds to side of the hutch so that we would know what was growing.

My mum found an old perspex 'window' to put on top of the veg bed. This will keep it moist and warm, perfect growing conditions.


I then admired my creation for the next two hours and wondered at how easy it was.

Linking up to Remodelaholic Share your Stories Fridays
(sorry, can't get the button to work)
See you soon!
:)

Wednesday, 21 April 2010

Shirred Skirts Tutorial

Have you ever thought that there must be an easy way to make skirts?
Here's an easy-peasy way to make one. If you use a pillowcase, half of the sewing is already done for you!
(Just check that the pillowcase will fit you first, if not, just make a bigger 'pillowcase' that will fit you)


So, go and find some cute pillowcases or fabric that you love and make a skirt. The best bit? There's no pattern!

Step One: If you want to embellish your outside pillowcase in any way (flowers, beads, ribbon) do this first. Now,Turn your two pillowcases (one for the outside and one for the lining) inside out and cut the tops off as shown in the photo. When you cut off the top of the pillowcase that will be used as your lining, take off a bit more of the length. This way, it won't show at the hem of your skirt.


Step Two: Turn your outside pillowcase the right way again and pin your pillowcases together. Make sure that the seams do not show, and that you don't pin all four layers together. The photos should explain.


Step Three: Turn over the edge you just sewed twice and pin in place, so that you can't see the raw edges. Sew away!


Step Four: Now it's time to do the shirring. Wind your elastic thread loosely onto a bobbin and put it into your machine. Use normal thread for upper sewing. Shirr several lines at the top of the skirt. The more lines you do, the stretchier your skirt will be! For further guidance on shirring, click here.


Make sure that you hold your threads when you cut them, if you don't you may get pinged by the elastic thread!
Trust me, it hurts!


When shirring, try not to smooth down the fabric. Let it go over all the bumps as this will also make it stretchier.


Step Five: Enjoy your easy new skirt!


:)

Saturday, 17 April 2010

Just a quickie...

to say that I'm rather excited as one of my photos won a little competition. Check it out by clicking here!

(and I may have danced round the room for joy, but don't tell anyone!)

Friday, 16 April 2010

Mooshy Belly Bunny from Chez Beeper Bebe

I can't remember how I came across this, but as soon as I saw it, I knew I wanted to make it!
Here's my version of the mooshy belly bunny.


Instead of old t shirts, I used cotton fabric. I didn't do a pom pom tail, either. This bunny is so cute, and easy to make! I knew that the cotton I used was likely to fray, so I zig zagged the edges. So far it hasn't frayed, and looks very secure! I definitely want to make more of them! The tutorial is excellent too, very clear instructions!

Please note: This is not a sponsored post! I found something cute and just wanted to share it with everyone else!

Thursday, 15 April 2010

Oops!

I suddenly realised today that I've been entering the wrong email address for things, so if I've contacted you asking to be featured, etc. I may have put the email address lizzydesigns@gmail.com. That is NOT my email address. 

My email address IS lizzydesigns1@gmail.com

My computer was doing it automatically for me, and I didn't realise it was using the wrong one. :(

Sorry for the confusion!

I'll be back tomorrow showing something that I made with another blogger's tutorial, see you then!

Monday, 12 April 2010

Decoupaged Train Photo Card

Please enter my poll if you haven't done so already! Click here for more details!
Do you have trouble thinking of ideas for 'manly' birthday cards?I do, too!
My dad loves trains, so when it was his birthday, I made him this card using a photo I had taken.
This technique could work for many different things, flowers, animals, trains, etc.

Here's how I made this card.

Step One: Print out three copies of your chosen photo.


Step Two: Cut out your background photo. Then, using the other two photos, pick out bits you want to stand out.


Step Three: Now, assemble your decoupage.
You can get foam sticky fixers specifically for decoupage, but I didn't have any so I made my own.
I cut out squares of cardboard and attached double sided tape to both sides of the cardboard.
Then, attach them to your photos just like you would with foam sticky fixers.


Step Four: Enjoy your card!


Friday, 9 April 2010

How did you find my blog? A poll!

Hi again!
It would be so helpful to me if you could tell me how you found my blog.
That way I know where my audience is coming from, and I can expand in that area!

Thanks so much! :)

Thursday, 8 April 2010

Preview of tutorials to come!

Unfortunately, I wasn't able to do a post yesterday; I had a fun day out with my mum instead. :)
I don't have anything finished to show you today, but I do have previews of tutorials to come!

In no particular order:

Decoupaged Train Photo Card


Baby Blocks/Pincushions


Repurposed: Pillowcase to Shirred Skirt


Repurposed: Pyjama top to T-shirt


AND MORE!

(I just haven't taken photos of them yet because I haven't completed them!)

Monday, 5 April 2010

GIVEAWAY winner!


Are you excited?!

Entrant number 1: Jes
Entrant number 2: Jenna
Entrant number 3: Jenna
Entrant number 4: Charlotte
Entrant number5: Charlotte
Entrant number 6: Estee

But who has won?
Random.org has picked the winner. Here's picture proof!


Congratulations, Charlotte! Your prize will be on its way to you soon!

Have you ever wondered why I want to give things away on this here blog?
Wonder no more. :)

I am a Christian, believing that Jesus came into the world to die to take away my sins. He rose again victorious over death, and can give us eternal life if we trust in Him to save us from our sins. This is the greatest gift EVER! I like to show my thankfulness to Him by giving things away to you guys. :D

You might have heard the Bible verse "It is more blessed to give than to receive" (Acts 20 v 35) I believe that's true because I am blessed and very happy when I give things away! Hopefully the receiver is, too. :) It also helps me to show them God's love to each and everyone of us. :)

Also, when I die, I want to remembered as a very generous person! I love giving away, please don't ever be shy about entering my giveaways. :D

Here's a photo to end with of Charlotte's prize.


I hope you enjoy using them, Charlotte!

:)

Thursday, 1 April 2010

Fabric Flower


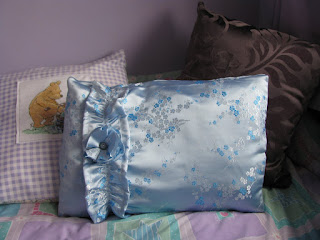
Are you wondering how I made the fabric flower to go on this beautiful cushion?

Wonder no more!

It's really easy, and doesn't involve much sewing.


These photos show different material, but it is the same technique. I didn't take photos of the blue one because I was experimenting and wasn't sure if it was going to work!

Step One: Cut 6 circles of fabric the same size.


Step Two: To make your petals, fold the circles in half and then half again, with the right side showing.  Stitch in place.


Step Three:
Repeat for four other petals, and stitch them together in the middle, one by one.


Step Four:
When all of your petals are joined, stitch them to the one remaining circle, and add a button to the center.


Your gorgeous flower is now complete! I pinned it to a safety pin and has fun experimenting with where it could go. I tried:

A bag:


I also played about with a flower that I made using this tutorial.

A hairband:


And even on a pair of shoes!


The flower on the left was made with scraps from this cushion, using the same tutorial as the flower on the right, but cutting out circles instead.

Have fun! Oh, and don't forget to enter my giveaway, here!

Want to make some quick and easy last minute Easter cards? Click here!